Category Olive’s Keep Calm & Carry On Christmas Survival Guide

Olive’s Keep Calm & Carry On Christmas Survival Guide: Make-Ahead Holiday Hors d’Oeuvres

Here is my holiday line-up of make-ahead, easy-assemble, or store-bought hors d’oeuvres, ranging from comforting to exotic, that are so delicious they will make you the talk of the town.

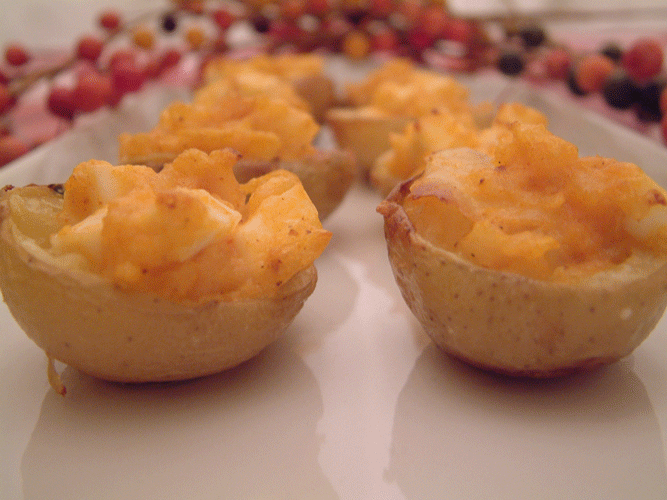
Paneer_Tikka_Stuffed_Mini_Potatoes

Paneer Tikka Stuffed Mini Potatoes

Makes 32 halves

My Paneer Tikka Mini Potatoes are stuffed with an exotic combination of Indian spices tamed by rich coconut milk, tomato paste, and soft paneer cheese. Mmm…cheese, potatoes, and a touch of the exotic in a make-ahead, freezer-friendly recipe – everything I am looking for in a special occasion hors d’oeuvres.

It’s well worth seeking out Arvinda’s Tikka Masala spice blend for this recipe. Based in Oakville, Ontario, Arvinda’s makes artisanal, premium Indian spice blends, using Canadian grown spices whenever possible, like mustard seed and coriander. Their Tikka Masala is a lively blend of all natural ingredients, including fresh organic garlic from Stratford, Ontario and fresh ginger.   It’s hot but the tiny amount in this recipe will blanket you in a pleasant (not painful) warmth with layers of flavour. You can find Arvinda’s finely crafted range of Indian spice blends in fine food stores throughout Ontario. Check their website for a store near you.

Paneer cheese is a mild, fresh, farmer white cheese. It is now widely available in many supermarkets or Indian grocery stores.

Ingredients:

Potatoes:
16 mini Yukon Gold potatoes, uniformly medium-sized
1 tablespoon olive oil
¼ teaspoon coarse salt

Stuffing:
1 cup (scant) finely diced paneer cheese
½ teaspoon Arvinda’s Tikka Masala spice mix
½ teaspoon salt
1½ teaspoons tomato paste
½ cup canned coconut milk, well-shaken

Garnish:
Finely chopped chives, green onion, or cilantro

Directions:

Potatoes:

  1. Preheat oven to 375°F. Cut potatoes in half so that each half will sit upright. Dump on parchment-lined baking sheet. Add oil and salt; toss to coat potatoes evenly. Arrange on baking sheet cut side up and evenly spaced so potatoes aren’t touching each other. Roast in a 375°F oven until just tender, 25 to 30 minutes. Let cool on baking sheet.

Stuffing:

  1. Using the pointed end of a vegetable peeler or a small spoon, carefully scoop flesh out of potato into a medium bowl, leaving a thin wall of flesh lining the potato skin. Roughly mash the flesh with a potato masher or fork.
  2. Add stuffing ingredients to mashed potato; mix well. Mound stuffing in potatoes halves.
  3. If serving immediately, arrange on parchment-lined baking sheet; bake at 375°F until hot throughout and cheese is soft, 7 to 10 minutes. Sprinkle garnish of your choice over top of each potato. Serve warm.
  4. Or place in an airtight container, separating layers with parchment paper, cover and store in the refrigerator overnight. Bring to room temperature while preheating oven to 375°F degrees. Arrange on parchment lined-baking sheet and bake until hot throughout and cheese is soft, 7 to 10 minutes. Sprinkle garnish of your choice over top of each potato. Serve warm.
  5. Or place in an airtight container, separating layers with parchment paper, cover and freeze up to 2 weeks. Bake from frozen in a 375°F oven, arranged on a parchment-lined baking sheet, until hot throughout and cheese is soft, about 15 minutes. Sprinkle garnish of your choice over top of each potato. Serve warm.


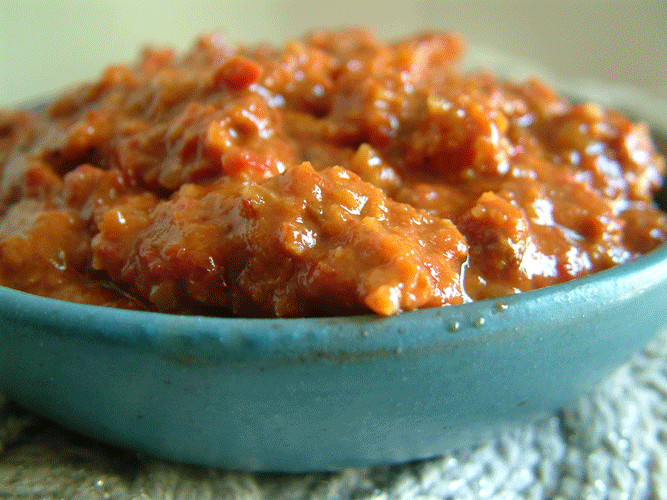
Muhammara

Muhammara: A Seductive Syrian Dip

You’ll find my recipe for a seductively delicious dip, that is festively colourful and healthy. in my post Mississauga Meet Muhammara: A Seductive Syrian Dip. This intriguing little number has layers of flavour and texture: roasted sweet red peppers, crunchy walnuts, acidic tomato paste and lemon juice balanced by sweet and tangy pomegranate molasses, and a warm spicy heat that slowly unveils itself. It’s a breeze to make at the last minute with most items stocked in the pantry, or it can be made ahead and refrigerated for a couple of days. or even frozen for up to 2 weeks. If you would rather purchase ready-made Muhammara, my post tells you where to buy a good one.

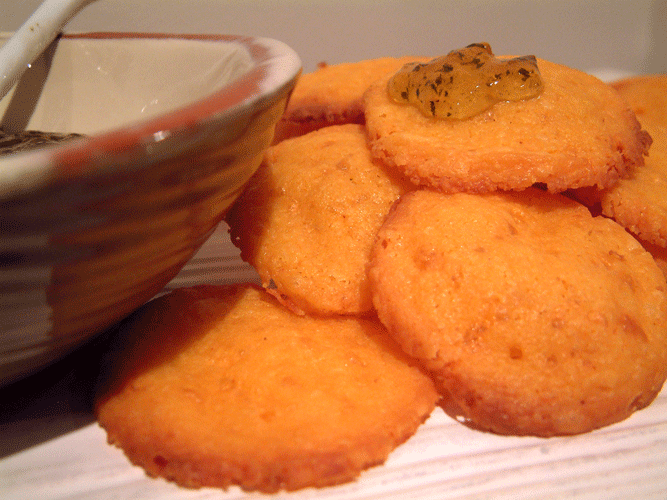
Cheddar_Cayenne_Cookies

Cheddar Cayenne Cookies

Makes 4 logs (about 24 cookies in each log)

Adapted from www.chatelaine.com Cheddar Crisp Appetizers

These savory cookies have a rich, cheddar flavour with a bit of a spicy kick. They are delicious on their own but spoon on Rootham’s Tangy Red Pepper Jelly or Yummies in a Jar Apple Sage Jelly and they become extra special. Make the dough ahead, roll it into logs, and freeze for up to 1 month; then simply take the dough out a few minutes before slicing and baking to serve your guests freshly baked cheddar cookies with pizzazz.

I’ve adapted a Chatelaine recipe by adding a touch of cream for moistness and a cup of grated old cheddar cheese for even more cheddar flavour. I use Stirling Creamery European-Style Churn 84 Salted Butter which has a rich butter flavour from 84% butterfat. Stirling also makes an unsalted version of Churn 84 but it’s hard to find in our region – you might find it in Sobey’s. If you would prefer to use unsalted butter, increase the salt in the recipe to 1 teaspoon.

Ingredients:

2 cups all-purpose flour
½ tsp table salt
½ tsp ground cayenne pepper (optional)
1 (250 g) container MacLaren’s Imperial Cold Pack Sharp Cheddar Cheese
1 cup Stirling Creamery European-Style Churn 84 salted butter, cut into small cubes
2 tsp Dijon mustard
4 tablespoons 35% cream
1 cup grated old cheddar cheese

Directions:

  1. In a medium bowl, combine flour, salt, and cayenne; stir with a wire whisk until evenly distributed.
  2. Break up MacLaren’s Imperial Sharp Cold Pack Cheddar Cheese with a fork before dumping it into the large bowl of a food processer; pulse a few times to break down to large crumbs. Add butter, mustard, and cream; process until smooth, stopping machine to scrape down sides with a rubber spatula as necessary. Add grated cheese and flour mixture; pulse, occasionally stopping machine to scrape down sides with a rubber spatula, just until mixture comes together.
  3. Scrape dough on to a large piece of parchment paper. Gently form into a ball by kneading gently once or twice. Divide dough into 4 equal sections. Place 1 section on another large piece of parchment paper. Roll dough section gently to form an evenly shaped log, about 1-1/2 inches wide by 6 inches long. Wrap in parchment paper then twist ends to seal. Repeat with remaining dough. Refrigerate until firm, at least 3 hours or overnight. Or wrap logs in aluminum foil and seal in a resealable freezer bag, label with baking instructions, and freeze up to 1 month; remove from freezer for a few moments before slicing and baking.
  4. When ready to bake, place oven rack on bottom shelf; preheat oven to 400°F. Slice one well-chilled log into 1/4-inch thick rounds; arrange (evenly spaced) on a parchment-lined cookie sheet. Bake one sheet at a time, on the bottom rack, just until edges are slightly golden brown, about 8 minutes; immediately remove cookies from cookie sheet and place on rack to cool. Repeat with remaining logs, removing 1 log at a time from the fridge.
  5. Best eaten the day you bake them but still good within a few days after baking, if placed in a sealed container and refrigerated. Serve at room temperature with apple sage or red pepper jelly. Look for Rootham’s Tangy Red Pepper Jelly or Yummies in a Jar Apple Sage Jelly at gourmet food shops such as The Shop For All Reasons in Streetsville, gourmet grocery stores such as Cousin’s Market in Port Credit, or fine cheese shops such as Mill Street Cheese Market in Georgetown (see my Grocery Store Directory). Or click on the product link to go directly to the product website for store locations.


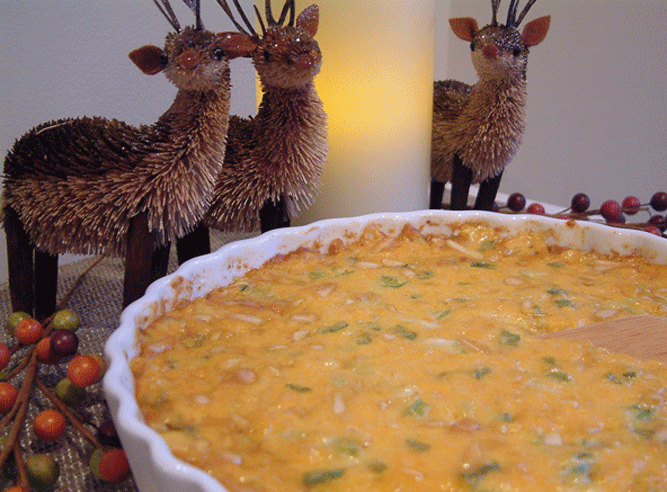
Cheddar_Dip

Sorry about the cheesy photo. I got a little carried away with the deer.

Hot Cheddar Dip

Enough to feed a crowd.

Adapted from Hot Cheese Spread from Best of Bridge

I’ve amped up the Hot Cheese Spread recipe from Best of Bridge to replicate the flavours of a dip I served in the ‘80s and loved, but lost the recipe. Artery-clogging but so delicious, I only serve this decadent dip at Christmas.

Make it ahead and store in the fridge for a few days. It makes enough to feed a crowd, so sometimes I split one batch into two if I have two smaller gatherings to attend. I have even frozen it, which isn’t ideal because the oil separates while baking, but once you have drained off the oil, you are still left with a ton of flavour, a lot less fat, and a bit of a stringier dip.

Ingredients:

1 cup slivered almonds
3 cups grated old cheddar cheese
2/3 cup finely chopped green onions (5 or 6 green onions)
1 garlic clove, finely minced
½ teaspoon curry powder
Dash cayenne powder
½ teaspoon salt
½ teaspoon soy sauce
½ teaspoon Worcestershire sauce
1 cup mayonnaise

Accompaniment:

Baguette crisps such as Ace Bakery Olive Oil & Sea Salt Mini Crisps

Directions:

  1. Preheat oven to 325°F. Spread almonds out in a single layer on baking sheet and toast lightly, just until golden, 3 to 5 minutes. Immediately remove from baking sheet to cool.
  2. In a medium bowl, mix cheese, onion and garlic together. In a separate bowl, combine curry powder, cayenne powder, and salt. Add soy sauce, Worcestershire sauce, and mayonnaise; blend thoroughly with a whisk. Fold into cheese. Add almonds. Stir until thoroughly mixed.
  3. Pack into an oven-proof serving dish. Bake immediately, or cover tightly and store in the refrigerator for a few days. Bring to room temperature before placing in a 350°F preheated oven. Bake just until hot throughout, about 15 minutes. Wonderful served with Ace Bakery Olive Oil & Sea Salt Mini Crisps.


Tomato_Bocconcini_Skewers

Tomato Bocconcini Basil Skewers

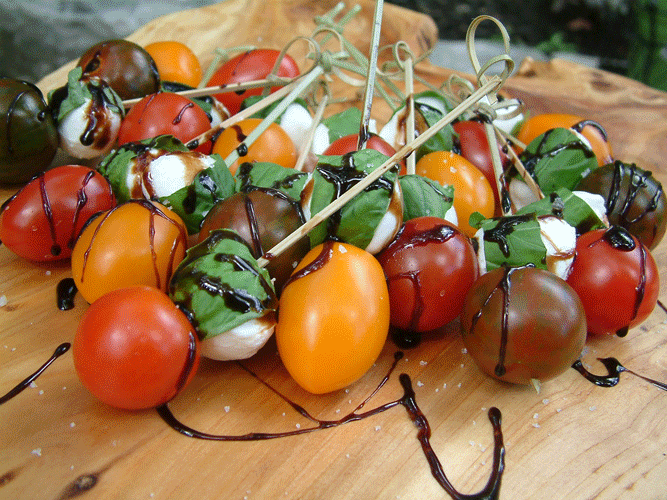
If you can get your hands on some really good cherry tomatoes and real buffalo mozzarella mini cheese balls, this festively-coloured hors d’oeuvres is easy-assemble and healthy. Click on my post Easy Breezy Summer Apps and scroll down for the recipe and details.

Keep calm and carry on. Love, Olive.

Read More

Olive’s Keep Calm & Carry On Christmas Survival Guide: Freezer-Friendly Side Dishes for Your Festive Feast

I love to do Christmas to the nines, with silver bells and all the trimmings. My best friend shares my Martha Stewart-ish passion for Christmas. We start every season with big dreams but as Christmas Day approaches, find ourselves more stressed with less and less time, until we are gritting our teeth while peeling potatoes to It’s the Most Wonderful Time of the Year and feeling like pulling our hair out while fiddling with fancy last minute fixings.

As a solution, we started a tradition of gently nudging each other to get an early start on Christmas, so when it is time to celebrate we can step out of our kitchens and enjoy it with our families. Beginning in November, we send each other a flutter of quick emails like: Christmas cards ordered CHECK, outdoor lights up CHECK, cookie dough frozen CHECK. What starts off as encouragement to prepare as much as possible in advance, often ends up in a hilarious race of merrily checking off our own list while sending out cheeky CHECKS if the other has fallen behind.

From now until Christmas, I’d like to share some of my Christmas survival tips with you: suggestions to make your holiday entertaining well-planned, stress-free, and delicious with make-ahead, easy-assemble, or store-bought ideas. Think of them as little gifts from your freezer or pantry to you, with love from Olive.

Let’s get a head start on Christmas dinner this week with a freezer-friendly mashed potato casserole and sweet-and-sour cabbage that you can make now and freeze. All you will need to prepare on the day of your feast is turkey, stuffing (I love My Mom’s Sage & Onion Bread Stuffing), perhaps another family-favourite vegetable dish, and gravy.

Because we have such a big clan, my family keeps our feasts as simple as possible. Here is my tip for the gravy (but don’t tell anybody): homemade gravy from Longo’s turkey kits. The gravy is sold separately and tastes homemade. I don’t have to fuss at the last minute and I know it’s going to be good. As soon as the kits come out, I buy the gravy individually and freeze it. I just defrost the night before serving and reheat gently the next day. Sometimes I add a little white wine, just to make it extra special. After December 19th, the individual side dishes (including the gravy) and complete turkey kits will be available in all Longo’s stores. If you want to pre-order the entire turkey kit (includes pre-cooked turkey, butternut squash, herbed mash potatoes, multigrain rice stuffing, cranberry sauce, and gravy – all just requiring reheating) for you feast, you need to place your order by 5 p.m. December 18, 2013.

Christmas potatoes done CHECK. Christmas cabbage done CHECK.

Please visit my Grocery Store Directory for Longo’s locations.

Swedish_potatoes

Aunt Connie’s Swedish Potatoes

Serves 8 to 10

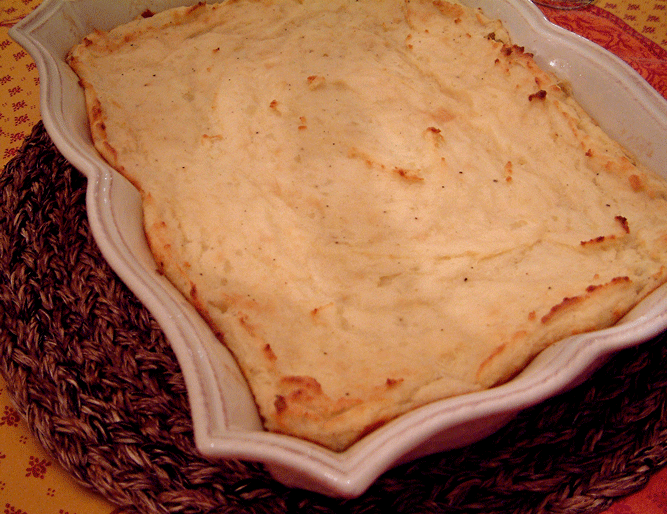
A long-time family favourite (just like my Aunt Connie), we serve these make-ahead potatoes at every Thanksgiving or Christmas family feast. This time-tested recipe has been around for ages but did you know you can freeze it for up to 3 months? Don’t tell my family, but I make a double batch of these just before Thanksgiving and freeze a batch in throwaway aluminum foil pans to have ready for Christmas dinner. You’ll be so happy to pop these out of the freezer and then pop the tray in recycling after the feast is over. Take the potatoes out of the freezer two days before serving and defrost in the refrigerator. Bake them while the turkey has a good long rest and then gets carved up.

My Aunt Connie’s version calls for a crumb topping made with fine bread crumbs and melted butter, but I omit the crumb topping so I can stir the potatoes as they are warming up in the oven.

Ingredients:

6 medium-sized russet (baking) potatoes, peeled and cut into sixteenths
2 tablespoons butter, cubed
¾ cup dairy sour cream
1 package (125g) cream cheese, cubed, softened to room temperature
1 ½ teaspoons onion salt
¼ teaspoon ground white pepper or freshly ground black pepper
½ teaspoon salt

Directions:

  1. Place potatoes in a large pot; cover with cold, salted water; bring to a boil, then adjust heat to medium to maintain a gentle boil; cook uncovered, until potatoes are very tender, about 15 minutes. Immediately drain into a colander placed in the sink. Return potatoes to pot and place pot back over very low heat for a few moments, shaking constantly, until all water evaporates. Remove pot from heat.
  2. Add butter to potatoes; mash with a potato masher, until potatoes are smooth and lump-free. Fold in remaining ingredients; beat gently with a mixer, just until all ingredients are thoroughly incorporated.
  3. If freezing, turn potatoes into a large, well-buttered, disposable aluminum-foil baking dish. Let cool completely in the fridge; then place a sheet of parchment paper over top of potatoes; double wrap with aluminum foil, sealing securely; label with baking instructions; freeze up to 3 months. Remove wrapping and parchment prior to baking. Defrost in refrigerator for two days before serving. Bake uncovered, in the centre of a preheated 350°F oven, just until hot throughout, about 30 minutes or longer (stir once halfway through baking). Watch carefully after 30 minutes.
  4. If baking immediately after preparing, turn potatoes into a large, well-buttered casserole. Bake uncovered, in the centre of a preheated 350°F oven, just until hot throughout, about 30 minutes or longer (stir once halfway through baking). Watch carefully after 30 minutes. Note: prepared potatoes can be stored, covered in the fridge, for up to two days prior to baking. When ready to bake, bring casserole to room temperature before placing in a hot oven.

Cabbage

Jeff’s Sweet-Sour Purple Cabbage with Apples

Makes about 9 cups

Adapted from Sweet-and-Sour Red Cabbage with Apples by Johanna Burkhard (The Best Freezer Cookbook by Jan Main).

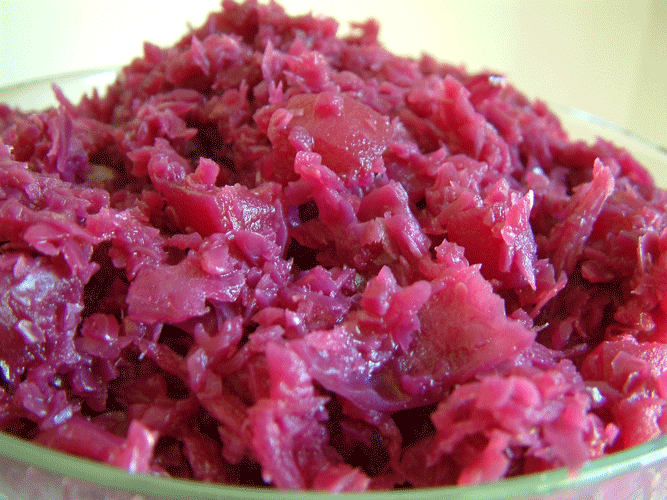
This sweet and sour cabbage recipe has always been a favourite of both my brother and my son. I just gave a bowl to my son and he said “Yo, cabbage for breakfast is awesome”. I love it because it’s a healthy and delicious way to easily add a pop of colour to a holiday plate – the purple looks so pretty beside green beans, broccoli, carrots, or squash.

It takes some work to finely shred the cabbage and prepare the apples and onions but it freezes really well for 3 months, so I make a double batch of this recipe at Thanksgiving and freeze the second batch for our Christmas feast. Or I freeze in smaller containers to use throughout the winter. Defrost in the fridge overnight and reheat gently on the stove. The flavours meld together with the second simmer.

If you are able to finely shred the cabbage in a food processor, cook this in one large pot. It will almost fill the pot but will cook down. Before I used a food-processor to shred my cabbage, I shredded it by hand; the cabbage wasn’t as fine and took longer to cook, so I had to divide one recipe between two large pots to speed the cooking – the end result was still delicious.

The recipe is from a cookbook called The Best Freezer Cookbook by Jan Main. It is the best freezer cookbook I have ever had my hands on – full of good freezing advice and comforting recipes, including a good Veggie, Beef & Pasta Bake, a yummy Chicken Tetrazzini, as well as some tempting soups and special occasion desserts I haven’t tried yet. I have changed the Sweet-and-Sour Red Cabbage with Apples recipe slightly, adding more apples, a touch more sugar, and using white wine and apple cider vinegar instead of red wine and red wine vinegar. It’s lovely with the red wine and the colour is a bit deeper, but I don’t drink red wine and hate wasting the rest of the bottle. I’ve also arranged the steps in a way that will keep your apples from browning before they hit the pot.

Equipment Notes:

Requires food processor and 1 large pot or two large pots

Ingredients:

1 medium purple cabbage
2 small yellow cooking onions
6 apples

2 tablespoons butter
1 cup chicken stock
½ cup white wine (or red wine)
1/3 cup apple cider vinegar (or red wine vinegar)
1/3 cup plus 1 tablespoon packed brown sugar
1 bay leaf
1 teaspoon salt
¼ teaspoon ground cinnamon
¼ teaspoon freshly ground black pepper
Tiny pinch ground cloves

1 ½ teaspoons cornstarch
1 tablespoon cold water

Directions:

  1. Finely shred cabbage and measure out exactly 10 cups to use for this recipe; set aside (use remainder in a salad). Finely chop onions; set aside. Peel, core, and dice apples.
  2. In a large pot, melt butter over medium heat. Add onions and apples; sauté, stirring frequently, until softened, about 10 minutes.
  3. Add stock, wine, vinegar, sugar, bay leaf, salt, cinnamon, pepper, and cloves. Bring to a boil, and then stir in cabbage. Reduce heat to medium-low, cover, and simmer, stirring occasionally, until cabbage is very tender, about 1 hour. Taste and adjust seasonings, if desired.
  4. In a small bowl, combine cornstarch with cold water; blend well, then stir into cabbage. Cook until sauce has thickened slightly, about 3 minutes. Remove and discard bay leaf. Serve hot.
  5. If freezing, let cool then divide into airtight freezer containers or resealable freezer bags, label, and freeze up to 3 months. Defrost overnight in refrigerator. Reheat gently on stove.
Read More