New Year’s Resolution #2: Tiny Chocolate Indulgences

It’s hard to go cold turkey (pardon the pun) after a season of festive overindulging. I know I’ll still need a treat once in a while, and when I do I’ll indulge in chocolate; not mass-produced, sugar-ridden candy bars but really good, finely crafted dark chocolate that ranks high on the pleasure scale and is relatively healthy.

Of course, gourmet chocolate is expensive but it is meant to be savoured one square at a time. One little square of the very best dark chocolate popped in my mouth – crunched once or twice just to break open the flavour, then melted very slowly to bring out the character and lengthen the pleasure while I swoon over the creamy luxury – is a tiny, worthwhile indulgence that will satisfy me far more than a flavourless candy bar.

To find the best dark chocolate I can get my hands on in my area, I head to my gourmet gurus, John and Loretta Viola, owners of The Shop For All Reasons in Streetsville.

The Shop For All Reasons

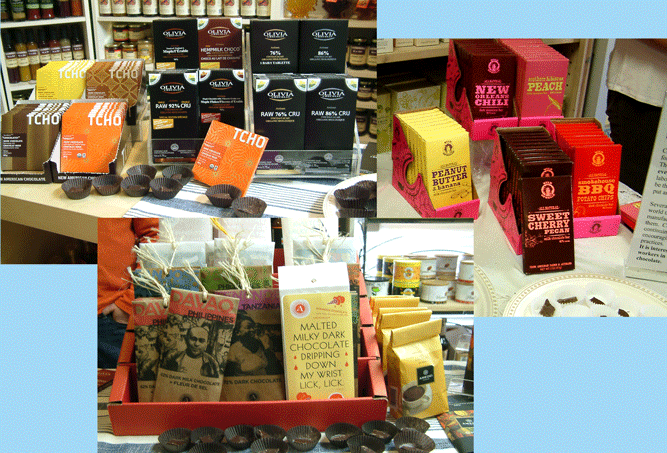
Behind these doors lies an impressive collection of gourmet chocolate and other gourmet specialty pantry products that the Violas have knowledgeably selected from some of the best local and international artisans, including what Food & Wine magazine called “the world’s best chocolate”.

Here is a line-up of the dark chocolate bar collection at The Shop For All Reasons, including some facts I learned from the Violas:

There are three types of cacao beans used to make chocolate: 1) Criollo is the best bean but is rare and susceptible to disease. 2) Forestaro gives higher yields but lacks flavour. Up to 90% of chocolate is made from this bean. 3) Trinitario is a mix of Criollo and Forestaro. It has more flavour than Forestaro and is more robust than Criollo.

What does “bean-to-bar” mean? Unlike big companies who mass-produce chocolate, artisanal “bean-to-bar” chocolate entrepreneurs import the dried beans themselves – usually directly from the farmers, working closely with the farmers, paying them fair prices, and often investing in them, to produce the best beans possible – and then craft the beans into bars. Bean-to-bar chocolate entrepreneurs sometimes prefer to redirect the money they would have paid for Fair Trade certification and invest it in the farming process.

Please click here to sign up for The Shop For All Reasons newsletter, to be informed of upcoming chocolate tasting and other tasting events. It’s a great way to learn about what you are buying and find your favourite before investing your money.

Amedei (Tuscany, Italy):

Tcho (San Francisco, CA):

  • Single origin, bean-to-bar chocolate.
  • Travels to plantations and works directly with farmers, providing innovation and technology, to produce great cacao. Provides flavour labs to farmers so they can make chocolate from their own beans and taste the result of their growing efforts (many cacao farmers have never tasted chocolate made from their own beans).
  • PureNotes dark chocolate focuses on 4 flavour tones inherent in different cacao beans: 1) Fruity (Peru), 2) Bright (Madagascar), 3) Chocolatey (Ghana), and 4) Nutty (Ecuador).

Askinosie (Springfield, MO):

  • Single origin, bean-to-bar chocolate.
  • Travels to plantations in Ecuador, Honduras, Philippines, and Tanzania, working closely with farmers to produce great cacao. Pays higher than Fair Trade prices to farmers and shares 10% of net profit of chocolate made from beans grown on their farms.
  • Two types: 1) Origin: single origin dark chocolate 2) CollaBARation: combines single origin Trinitario dark chocolate with flavours such as malted milk, licorice, and coffee.

Olivia (Cantley, Quebec):

  • Single origin (Caribbean Islands), certified organic, milk-free, bean-to-bar chocolate – roasted or raw.
  • Raw chocolate is made from non-roasted Criollo/Trinitario beans. Because the beans are not roasted, this chocolate is smoother and less bitter, allowing 10% more beans without the need for more sugar.
  • HempMilk Chocolate is raw, bean-to-bar, soy-free, nut-free, vegan, and dairy-free; uses only hemp milk not cow’s milk.

Wild Ophelia (Chicago, IL):

  • All-natural, preservative-free, often organic ingredients from “esteemed farms and artisans throughout the USA”.
  • High-quality chocolate combined with wildly creative flavours such as: Smokehouse BBQ Potato Chips (dark), New Orleans Chili (dark), Southern Hibiscus Peach (milk), Peanut Butter & Banana (milk), and Sweet Cherry Pecan (milk).
  • Created by “chocolate revolutionary” Katrina Markoff, founder of Vosges Haut-Chocolat.

Gourmet Chocolate

Address and contact information for The Shop For All Reasons can be found on my Grocery Store Directory.

Some information obtained from product website.

Read More

New Year’s Resolution #1 Make Veggies the Star of the Plate: Mashed Caramelized Cauliflower & Steamed Vegetables with Flavoured Butter

I’m making vegetables the star of my plate by preparing them with a little extra love instead of treating them as an afterthought. I’ll either give them a leading role across half of my dinner plate or serve them solo in individual courses – as the French do – and give them centre stage. It is so satisfying to be served one or two carefully prepared vegetable courses (salads, soups, or cooked vegetables), followed by a smaller main dish.

Steamed_Veggies_Flavoured_Butter

You don’t have to serve my Mashed Caramelized Cauliflower and Steamed Vegetables with Flavoured Butter together but I think they make a nicely composed plate. The cauliflower steps in for mashed potatoes and is mounded on the plate first; the steamed veggies are stacked artfully around the cauliflower and then adorned with fine sea salt and a tiny dollop of flavoured butter.

Make the flavoured butter first, ideally well ahead of time (you can even freeze it for longer storage). Prep the cauliflower and mixed vegetables earlier in the day. When you are ready to cook the vegetables, prepare the cauliflower first and keep it warm; then steam the vegetables. You can even make the cauliflower ahead and reheat it gently in the microwave just before serving; and you can make the steamed veggies ahead if you undercook them slightly, then later sauté them in the flavoured butter just until heated through – but they only take up to 8 minutes to steam, making them easy to do last minute.

Mashed Caramelized Cauliflower

Serves 4

The key to mashed cauliflower is to add as little liquid as possible. Roasting the cauliflower in the oven instead of boiling it prevents the cauliflower from becoming waterlogged and adds a delicious caramelized flavour. You can play with the flavours of this basic mash when you are puréeing the cauliflower, by adding curry powder, grated parmesan, or whatever you like to pair with cauliflower.

Ingredients:

1 head of cauliflower
1 tablespoon olive oil
½ teaspoon coarse salt
1 tablespoon butter, softened
3 tablespoons or more of milk or cream, warmed
Freshly ground black pepper, to taste

Directions:

  1. Preheat oven to 375°F. Remove and discard the leaves and large centre stalk of the cauliflower; cut the remaining cauliflower into evenly-sized florets; wash and then thoroughly drain.
  2. Dump the cauliflower (including the crumbly bits) onto a large, parchment-lined, rimmed baking sheet. Add oil and salt; toss with your hands to coat evenly; spread out evenly in a single layer. Roast for about 40 minutes, until the largest pieces are very tender and cauliflower is golden, turning once after 25 minutes.
  3. Transfer cauliflower to the large bowl of a food processor. Add butter. Purée until smooth, stopping to scrape down sides of bowl with a rubber spatula when necessary, and adding milk or cream slowly, only a bit at a time and just enough to get the consistency you want. Season to taste with freshly ground black pepper and additional salt, if necessary. Serve hot.
  4. If making ahead, transfer to an airtight container, cover, and store in the refrigerator overnight. When ready to serve, reheat gently in the microwave, stirring occasionally, until hot throughout.

Steamed Mixed Vegetables with Flavoured Butter

Serves 4

The butter is your palette and the vegetables are your canvas; choose whatever vegetables and butter flavouring combinations that please you most.

Curried Tomato Clementine Butter

Makes ¼ cup

This recipe is just a suggestion of how you can play around with different butter flavourings; the possibilities are endless – perhaps lemon and fresh thyme or lime and fresh basil (omit the curry powder, tomato paste, and clementine zest)?

Ingredients:

¼ cup unsalted butter, softened
Pinch of sugar
Pinch of salt
⅛ teaspoon Arvinda’s curry powder
1 tablespoon tomato paste
Finely grated zest of 1 clementine (avoid white pith)

Directions:

  1. Place all ingredients in a small bowl; mash with a fork, stirring to mix thoroughly.
  2. Place on a small sheet of parchment paper; roll into log, twisting both ends tightly to seal. Store in the refrigerator until ready to use.
  3. Slice or shave off the desired amount of butter onto freshly steamed vegetables, grilled fish, or roasted chicken. Any unused portions can be stored in parchment paper, enclosed in a resealable freezer bag, and placed in the freezer for longer storage.

Steamed Mixed Vegetables

Serves 4

Choose whatever combination of colourful, seasonal vegetables you like; again the possibilities are nearly endless. My local Longo’s carries baby Sunburst squash, baby zucchini, baby turnips, and real baby carrots (Harvest Fresh Sweet Nantes Carrots and not those bagged, pared down “baby” carrots). If you can’t find baby veggies, just cut whole veggies into smaller portions.

If you have a stacked steamer, place the veggies that take longest to cook on the bottom level and those that cook more quickly on the top level. I only have a single steamer, so I place them in groups all in one steamer. Either way, watch them carefully and remove each group of vegetables as soon as they are cooked to your liking.

Ingredients:

Salt for water
3 baby turnips, cut into eighths
6 baby carrots (comments in intro above), longer ones cut half
200 g baby Sunburst squash
200 g baby green zucchini
Flavoured butter (see recipe above)
Fine sea salt

Directions:

  1. In a large pot, bring salted water to a boil; reduce to a simmer. Arrange vegetables in groups in a steamer placed over the simmering water; cover and steam for 5 to 8 minutes, checking carefully and removing the vegetables as soon as they become tender (some will be ready before others).
  2. Serve hot, seasoned to taste with fine sea salt and adorned with flavoured butter.
Read More

Fun, Festive Finish to the Holidays: Almond Pithivier from Patisserie D’Or

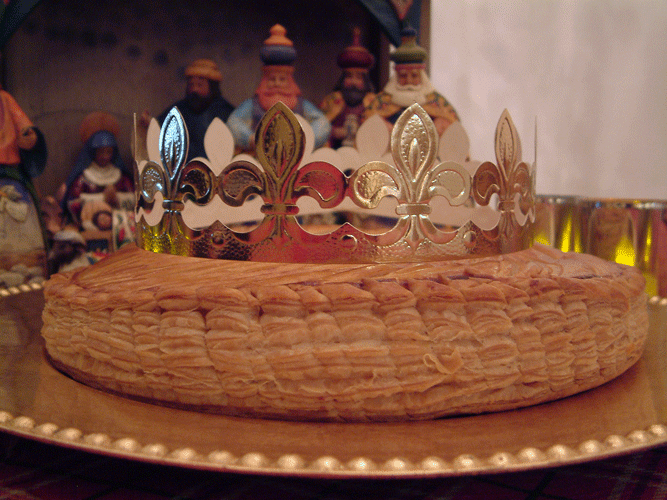
Here is a fun, festive way to finish the holidays: an Almond Pithivier from Oakville’s Patisserie D’Or. Also known as Galette des Rois (cake of kings), Almond Pithivier originates from Pithiviers, France and is traditionally served on January 6th to celebrate the Epiphany (when the three kings arrived to celebrate the birth of Christ).

Almond_Pithivier Patisserie D'Or

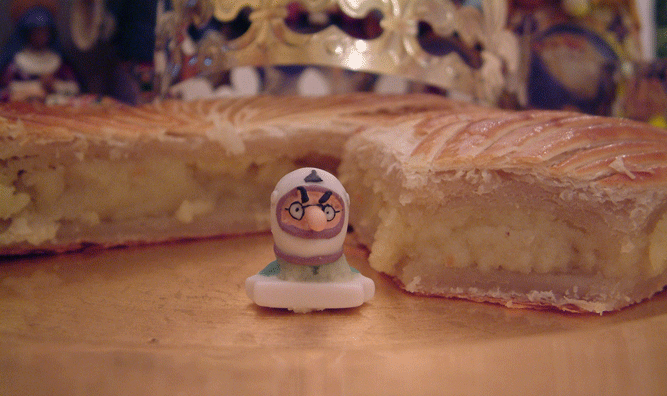
Patisserie D’Or handcrafts their all butter puff pastry which enrobes a delicious frangipane (almond cream) filling; hidden inside is a small porcelain figurine. According to tradition, the person whose slice holds the hidden trinket is honoured as King for the Day and gets to wear the paper crown. The figurine is small; tread carefully until you find it.

Patisserie_D'Or_Almond_Pithivier

Found! My son is King for the Day; we are at his mercy. Good thing midnight soon approaches!

Available in plain almond, apple almond, or pear almond. Includes hidden porcelain figurine and paper crown. Purchase frozen, defrost for 30 minutes, and follow the easy baking instructions. It bakes up beautifully.

Please call ahead to ensure availability. Check my Grocery Store Directory for contact and location details for Patisserie d’Or.

Read More

New Year’s Dinner: Roasted Beef Tenderloin with Red Wine Drizzle and Thyme Roasted Potatoes

‘Tis the morning after Christmas and all through the house,
Not a creature is stirring, not even a mouse.
The wrappings were strewn all about with great flair,
Now Dad snores loudly in his favourite chair.

The dog is nestled all snug in his bed,
While visions of squirrels dance in his head.
And my son in his PJs, cuddled in my lap,
Has just settled his brain for a long winter’s nap.

When in my mind, there arises such a clatter,
I spring from the couch to try to fix the matter…
After turkey and tinsel, we are all tuckered out,
But now there’s New Year’s dinner to fret about!

Keep calm and carry on, Olive has got you covered:

Roasted Beef Tenderloin with Red Wine Drizzle and Thyme Roasted Potatoes

I served this menu one year for my cherished bro and his dear family when we gathered around his cottage dinner table a couple of days before Christmas. The meal was easy, flavourful, and festive. My son thrilled to be surrounded by his cousins; my brother cracking all of us up with his incredible sense of humour; me, happy to be at his side…the evening forever sings in my heart. Consider splurging a little and serving this festive feast to your loved ones to celebrate the New Year. Wishing you a healthy and happy 2014.

A festively-coloured trio of vegetables made this menu extra special. Laura Calder’s Thyme Cream Tomatoes (from her Buckwheat Crêpes with Thyme Cream Tomatoes recipe) are simple yet sublime. I learned from Ricardo how to sauté frozen peas (straight from the freezer) in a few tablespoons of butter or olive oil, and then season with salt (sorry, can’t find his recipe anywhere on his site but that’s all there is to it). And of course, I served my brother’s favourite Sweet-Sour Purple Cabbage with Apples (which I made ahead and froze).

We started out with a recipe for the beef tenderloin but felt it needed tweaking, so Jane winged it from there; it turned out beautifully but of course, we didn’t write it down. Since then, I’ve tested a few recipes, selected what I liked from them, and combined them into this recipe.

Beef_Tenderloin

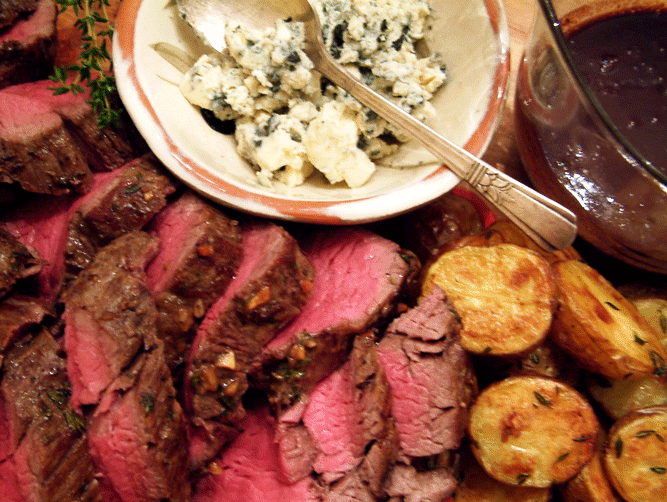
Roasted Beef Tenderloin with Red Wine Drizzle and Thyme Roasted Potatoes

Serves 4 to 6

This meltingly tender yet flavourful beef tenderloin drizzled with a red wine and beef stock reduction is wonderful served with some crumbled blue cheese on the side and Thyme Roasted Mini Potatoes.

Get the potatoes in the oven first and then prepare the beef; remove the potatoes from the oven when done and let them rest at room temperature. When the beef has finished cooking, return the potatoes to a 250°F oven to warm up while the beef has a good long rest.

Thyme Roasted Potatoes

Ingredients:

3 lbs. mini Yukon Gold potatoes
2 tablespoon olive oil, divided
1 teaspoon coarse salt, divided
3 teaspoon chopped fresh thyme, divided

Directions:

  1. Place both oven racks in middle of oven, leaving enough room between to fit a tray of potatoes. Preheat oven to 375°F.
  2. Cut potatoes in half; divide evenly between two parchment-lined, rimmed baking trays.  Divide oil, salt, and thyme evenly between both trays; toss on potatoes, turning with your hands to coat evenly. Arrange potatoes cut side down and evenly spaced out on trays.
  3. Place one tray on each oven rack; bake until tender and cut side is golden brown, about 25 to 30 minutes, rotating trays between both racks after 15 minutes.

Roasted Beef Tenderloin with Red Wine Drizzle

Butcher Bob at Burton Meats (Dundas St. location) sold me a superb beef tenderloin. He recommended that I sear the tenderloin first, and then cook it at a lower temperature of 375°F (contrary to many recipes that instruct the beef to be cooked at 450°F). He was right; it was so tender that I actually could cut it with a fork. Be sure to buy the No Salt Added beef broth (even low sodium will be too salty).

Ingredients:

1 whole beef tenderloin 3-lbs
Coarse salt to taste
Freshly ground black pepper to taste
1 tablespoon olive oil

Rub:
1 teaspoon white sugar
2 cloves garlic, finely minced
1 tablespoon chopped fresh thyme
1 tablespoon Dijon mustard
1 tablespoon low sodium soy sauce
3 tablespoons butter, softened

Drizzle:
1 ⅓ cup good red wine
1 tablespoon tomato paste
⅔ cup Campbell’s No Salt Added Beef Stock or homemade beef stock
1 tablespoon butter

Accompaniment:
Crumbled mild, creamy blue cheese and/or horseradish

Directions:

  1. Preheat oven to 375°F. Season beef lightly with coarse salt and generously with freshly ground black pepper.
  2. Heat oil in a large non-stick skillet over medium heat; when oil is hot, sear beef on all sides until evenly browned, about 1½ minutes to 2 minutes per side. Place meat on a rack in a roasting pan that can also be used on stove top.
  3. In a small bowl, combine Rub ingredients; spread evenly over meat. Insert an oven-proof thermometer in middle of tenderloin; roast until thermometer reads 130°F, about 25 minutes (it will continue to cook as it rests) – the end result will be medium-rare, slightly on the rare side.
  4. When beef is cooked as desired, carefully remove roasting rack and beef to a rimmed baking sheet while protecting your hands and any surfaces that come in contact with the hot rack (you want the meat to rest on the rack and not a flat surface); tent loosely with foil to keep warm; let rest for at least 20 minutes.
  5. Meanwhile, drain fat and any clumps from roasting pan. Place roasting pan on stove over medium heat. Add wine to pan; deglaze pan with wine, scraping any brown bits on bottom of pan with a wooden spoon to incorporate into sauce. Simmer rapidly over medium heat, stirring constantly so garlic doesn’t burn until reduced, about 5 minutes. Add tomato paste to pan; cook, stirring constantly, for 1 minute. Add beef stock; simmer rapidly, stirring frequently until reduced by half and thickened, about 4 minutes. Remove pan from heat; whisk in butter, stirring until fully incorporated.
  6. Slice beef thickly and serve immediately with sauce and accompaniments.
Read More

Crêpes Audrey

I served these elegant make-ahead crêpes to my Mom one Christmas morning, while the sun was streaming in and illuminating her graceful face. She titled her head in her usual loving way and gave a simple, gentle response: “exquisite” (she was my biggest fan). I immediately named them Crêpes Audrey and have served them on Christmas morning ever since.

Crepes_Audrey

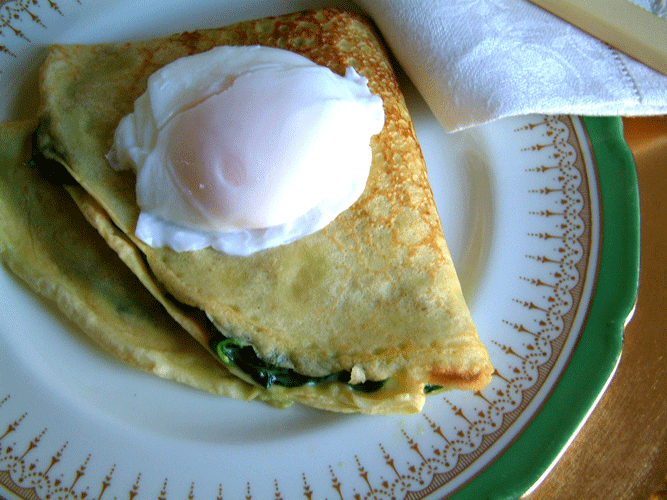
Crêpes Audrey are filled with either spinach and béchamel or ham and mushrooms – I double the recipe for my crêpe batter and make both fillings, so my guests can choose either or one of each. The filling is spread thin enough to be able to fold the crêpe over twice. Because they are topped with a poached egg, these crêpes aren’t covered in heavy sauce. The end result is a delicious, light crêpe that will tide you over until Christmas dinner.

Instead of fussing on Christmas morning, I make these up to one week in advance. Make the crêpe batter first, let it rest in the fridge while preparing the filling, and then make the crêpes. Once the filling and crêpes have cooled, stuff the crêpes and freeze them; defrost overnight in the refrigerator. On Christmas morning gently bake them; meanwhile, poach one egg to adorn each crêpe and voilà, everybody is pampered and clean up is a breeze.

Here is a photo of my beautiful Mom holding me as a newborn, with the light streaming in the same way it did that morning I served her my crêpes. May your heart be filled with the love of your family on Christmas morning. Merry Christmas everyone.

My Mom and I

Kathryn’s Crêpe Batter

Makes 6 crêpes using a 10” crêpe pan. Needs 1 hour resting time.

When visiting our Montreal family, we can always count on a delicious breakfast: Gabriel’s omelet or Kathryn’s homemade crêpes, and really good coffee. But the best part is, enjoying it with our lovely nieces.

One crêpe batter recipe makes enough crêpes for one recipe of Spinach Béchamel Filling or one recipe of Ham & Mushroom Filling. If you are making both fillings, double the crêpe batter recipe. The finished crêpe should be thin, so just add a little batter to the pan and quickly tilt the pan to swirl the batter evenly across the surface of the pan. Don’t worry if your first crêpe is a bust; this batter makes about seven crêpes – the first crêpe is often a trial crêpe that won’t turn out perfectly.

I have used both an inverted crêpe pan (which makes ultra thin crêpes) and a 10” cast iron crêpe pan (which makes the crêpes slightly thicker). For Crêpes Audrey, I prefer to use the cast iron crêpe pan – the slightly thicker crêpes are stronger and won’t tear as easily while filling and folding. Kathryn doesn’t add the melted butter, but I have more success with my crêpe pan if I do.

Dry Ingredients:

⅞ cup all-purpose flour (scooped and leveled not spooned and leveled)
¼ teaspoon salt

Wet Ingredients:

¼ cup unsalted butter, melted
1 cup milk
3 large eggs
1 teaspoon vegetable oil for brushing crêpe pan

Directions:

Choose either Mixer Method or Blender Method to prepare the batter and then proceed to the Cooking instructions.

Mixer Method:

  1. In a medium-sized bowl, combine flour and salt; mix with a whisk until combined thoroughly; set aside.
  2. Place melted butter, milk, and eggs in a large bowl; using a mixer, whip until blended. Add flour mixture; mix on low speed until batter is smooth, stopping to scrape down sides of bowl with a rubber spatula when necessary.
  3. Place batter in refrigerator to rest for 1 hour. Bring to room temperature for 15 minutes before proceeding.

Blender Method:

  1. Place melted butter, milk, and eggs in a blender; blend until combined. Add flour and salt; purée until batter is smooth, stopping to scrape down sides of blender with a rubber spatula when necessary.
  2. Place batter in refrigerator to rest for 1 hour. Bring to room temperature for 15 minutes before proceeding.

Cooking:

  1. Preheat crêpe pan over medium heat; brush lightly with vegetable oil. Whisk batter until smooth. While protecting your hand with an oven mitt, grasp handle of crêpe pan and tilt pan slightly off heat; add a scant ⅓ cup of batter (¼ cup for a 9” crêpe pan) to the centre of the hot pan and quickly and continually tilt pan in a circular motion to swirl batter evenly and thinly over surface of pan; as soon as surface is coated evenly, return pan to heat. Cook until underside of crêpe is golden, about 1 minute. Using a heatproof spatula, loosen the edges of the crêpe, then slide the spatula under the crêpe and flip crêpe over; cook until second side is golden, about 1 minute. Carefully remove cooked crêpe with rubber spatula; place on a parchment-lined baking sheet or cooling rack.
  2. Repeat with remaining batter, lightly oiling pan if necessary, placing cooked crêpes in a single layer, and separating any additional layers with parchment paper.

Crêpes Audrey

Makes 6 servings of 1 or 2 crêpes each.

Ingredients:

6 prepared crêpes and 1 batch of Spinach Béchamel Filling
And/or
6 prepared crêpes and 1 batch of Ham & Mushroom Filling
6 eggs for poaching

Spinach Béchamel Filling:

Stuffs 6 crêpes.

Spinach Ingredients:

1 package (1 lb/454 g) pre-washed fresh baby spinach leaves
1 teaspoon olive oil

Spinach Directions:

  1. Heat oil in a large Dutch oven over medium heat; add half of spinach and sauté, continually turning and lifting bottom spinach leaves to top, until volume reduces and there is room to add remaining spinach; add remaining spinach and sauté, turning and stirring quickly and constantly, until all spinach is just wilted.
  2. Transfer spinach to a colander set over a bowl; press with back of spoon to drain out all excess water. Place drained spinach on a cutting board and chop roughly; set aside. Wipe pan clean to use to make béchamel.

Béchamel Ingredients:

2 tablespoons butter
1½ tablespoons all-purpose flour
½ teaspoon salt
Freshly ground black pepper, to taste
¾ cup milk

Spinach Béchamel Filling Directions:

  1. In same large Dutch oven, melt butter over medium heat (watch carefully to prevent butter from burning). Add flour; whisk constantly until mixture just starts to turn golden and fragrant (like the smell of shortbread baking), about 1 minute. Immediately but slowly add milk, whisking constantly; cook over medium heat, whisking constantly, until mixture thickens, about 3 minutes – mixture should be bubbling but not burning bottom. Whisk in salt. Remove from heat; fold in cooked, drained spinach leaves, blending thoroughly.
  2. If freezing, let filling cool before stuffing crêpes. Spread about 2 tablespoons filling over half of one crêpe. Fold in half and then in half again to create a triangle. Freeze in resealable freezer bags, using parchment paper to separate overlapping crêpes, up to 1 week. When ready to bake, defrost stuffed crêpes in the refrigerator overnight. See Stuffed Crêpes Baking Instructions below.

Ham & Mushroom Filling:

Stuffs 6 crêpes.

Sautéed Mushrooms Ingredients:

1 teaspoon olive oil
1 package (8 oz/227g) washed, sliced white mushrooms
1 tablespoon butter
1 tablespoon roughly chopped fresh thyme leaves
¼ teaspoon coarse salt
Freshly ground black pepper

Other ingredients:

½ cup grated old cheddar cheese
100 grams thinly shaved black forest ham

Sautéed Mushrooms Directions:

  1. Heat oil in a non-stick skillet over medium heat; add mushrooms; sauté until mushrooms release all of their water and turn golden brown, about 10 minutes.
  2. Add butter, thyme, salt, and pepper; sauté, stirring often, until mushrooms are golden brown and thyme is fragrant, about 5 minutes. Let cool before filling crêpes.

Ham & Mushroom Filling Directions:

  1. Divide ham evenly between 6 crêpes; lay a thin layer of ham over half of each crêpe. Top with a thin layer of mushrooms. Sprinkle lightly with cheese. Fold crêpe in half and then in half again, creating a triangle.
  2. Follow freezing instructions for Spinach Béchamel Filling. When ready to bake, defrost stuffed crêpes in the refrigerator overnight. See Stuffed Crêpes Baking Instructions below.

Stuffed Crêpes Baking Instructions:

  1. Defrost stuffed crêpes in the refrigerator overnight. When ready to bake, preheat oven to 325°F. Place crêpes in a single layer on a parchment-lined baking sheet; cover with foil. Bake just until crêpes are hot throughout, 10 to 15 minutes.
  2. Place on a serving plate. Top with a well-drained poached or fried egg and garnish with a lemon wedge, if desired. Serve warm.


Read More